Sunday, January 31, 2010

Baby Shower goodies!


I am telling you I wish I had a better camera, you know one of those fancy ones that make all your craft projects appear so nice and wonderful? Yah one of those. When I post something I think to myself "Man this sure does look betetr in person" but I gotta work with what I have so this camera will do for now :) This past week I was SUPER busy on the sewing front! I went to a babyshower yesterday ... My hubby has been recooperating all week from surgery so I stayed around the house to take care of him, and when he slept I sewed ... look at the baby gifts I gave that lucky gal!
She's going for a shabby chic/country garden look ... so thats the fabrics I chose!
The bib pattern I used was from an already existant bib I borrowed from a friend. And I attached velcro on the straps.
The burp cloths *they are rolled up and tied with a ribbon in this pic above* I just cut out 2 squares approximately 12x20 I use my choice of fabric and a pink terrycloth fabric for the back.
For the diaper clutch .. oh man I love this thing, I mean there comes a time when you don't need a HUGE diaper bag just a couple diapers, or when you run to the store for a couple mins and dont wanna take much this diaper clutch is genious! I follwed THIS tutorial.
I also made 2 binkie clips for her ... and forgot to take a picture I followed THIS tutorial except I used fabric instead of ribbon. I sewed (or hemed whatever the correct term is) the fabric, they were sooo cute I really wish I didn't forget to take a pic of those, and the fabric was SUPER adorable too!
However I did snap a picture of the diaper clutch open ... cute huh?!
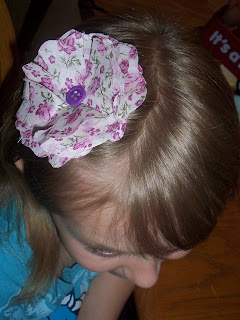
And for her I also made 2 fabric flowers one for a headband and one for a clipie *my lovely model is trying them on*
This picture stinks ... but owell! I put all the stuff in a cute little basket and was on my way! The hostess of the baby shower like it so much she put my gift on a pedestal for "showcase" I was so proud of me! hehe! A little time and effort goes a long way! I would love to have homemade one-of-a-kind gifts rather than your store bought, everyone has it gift!
Happy Sewing!
Linked up to Ramblings of a Crazy Woman!

Thursday, January 28, 2010

Kids in The Kitchen-Cheesecake Pops


Seriously I think I should put a warning label on our food item today!! WARNING: If you make these you might eat them all, they are so good and just pop right into your mouth! Your thighs may not like it, but hey who's watching?!
My version of a cheesecake pop:

Make a "No Bake" store bought box *I know store bought OH NOO!* of cheesecake, and let it set up in fridge for 1-2 hrs. Then Put the whole thing crust and all in mix with hand mixer.

Put filling in zip-lock baggie, cut tip and make a good size circle of cheesecake goodness, then stick loli-pop sticks in them, and freeze for a couple hours or over night then....

dip in chocolate! Now I am a chocolate lover and all but I will admit it, these are just fine without it, and you can skip this step all together, but please take my advice and eat them frozen, they are delish .. you don't have to go hurting your teeth and all by trying to bite into a super cold lump of goodness, just suck on it like a loli-pop and it will melt away!!
SUPER YUMMY! Easy ... it takes time between the freezer and all but is all well worth it!!! They are so good!
Please link all your kids in the kitchen stuff to Mr. Linky!

Tuesday, January 26, 2010

Heating/Cooling Rice Pack


I sewed this tonight, in 15 mins! Isn't it great? I have BAD back problems and I thought it would certainley help! I have alot of friends who get migrains so I thing I am gonna make some gifts :)

I used a 13x13 piece of flannel, sew the right side together on either side (long side) hemed the two short sides, then sewed one side together, put 2 cups rice and 6 drops of lavender, then sewed the other side and VOILA!!! Thats it! Put a matching ribbon on it, if I were to give it away the ribbon would be cute! and there you have it!

Lu didn't wanna get up LOL! However as I am typing I noticed Joshy stole it, heated it up and is using it on his head *bc he has a bad headache today* he says its wonderful! I think so too and I better get making some more so I can actually have one for myself, cuz I think this one has dibs on it by both Joshy and Lu! Happy Sewing!

Monday, January 25, 2010

Muffin Tin Monday-ABC's & 123's


Today's MTM theme was ABC's & 123's we choose to do ABC's. Lu is always super hungry after school, probably because her class eats at 11:00am which is crazy if you ask me because school doesn't start until 20 mins till 9am so they eat a couple hours after they arrive ... hmm! Glad I pack her a snack everyday!
We did an afternoon snack for our MTM!

A is for Apple
B is for Banana
C is for Craisins
I was actually gonna do 3 apples, 4 banana's (which I did do) and 5 craisins, but 5 craisins I thought was nothing not enough, but little squirt over here saw what I was going for, counted 5 craisins and thats all she ate...little stinker! :)

And of course we put in p-nut butter for good measure ... She LOVES to dip!!! Who doesn't?? Happy Monday All!!

Friday, January 22, 2010

Ariel Jean Skirt


I'll admit it ... this is the toughest sewing project I've done to date! It took me HOURS ... but it was worth it when I saw the smile on Lu's face.

I think I will actually give directions on this one bc its so cute and your little one would be so happy and I think next time it won't take me as long!
First I went into Lu's "give away clothes pile" because lets face it, this girl is tall, but she don't have any meat on her, her pants are ALWAYS too short, but still fit her in the waste!!!
Step 1: Cut jeans about 1 in" below the zipper, then you will have a REALLY short skirt
Step 2: Make a stitch (I did a zig-zag) along the bottom of the "jean skirt" DON'T hem it, no need to fold, just zig-zag it so it wont fray in the future.
Step 3: Measure how long you want the skirt to be, I tried the skirt on Lu and measured from the bottom of the jean until where I wanted it to sit *just above her knees* add about 1 to 2 inches for seam allowence. Now Measure width my with was 12" times that by one and a half so mine was 30"
Step 4: fold both bottom and top of the ariel fabric (or whatever kind you chose) over twice and hem.
Step 5: AND MOST TRICKY this is the reason I am writing directions bc there are other tutorials out there for skirts LIKE this, but I kept messing up at this part *which is why it took me so long* so finally I scrapped this step and made my own! I pleated AS I SEWED so I sewed, pleat, sewed, pleat all the way along the skirt with a straight stitch, and it worked well. I tried the whole "ruffle method" and the thread kept breaking and the stitch would come out bc the fabric was too long, then I tried pleating it and pinning the pleat it didn't look all that great, so I did It as I went along ... and it actually turned out really well!!! *I hope that this didn'y confuse you!*

Now I am gonna transform a shirt so it will match with her new skirt! She love this skirt, and I love how it turned out!!!
Happy Sewing!!!!
Linked up to We Made It! Showcase Friday!

Thursday, January 21, 2010

Kids In the Kictchen Blonde Brownies


Welcome to Kids In The Kitchen! Yep me and Lu are back to desserts!! Its been a while since I've posted a good ole' ooey gooey mess of goodness .... We have a sweet tooth what can I say! Call me crazy I'll admit it, I've never made blondies before ... oh man what have I been missing? These little beauties are ADDICTING!!!!

1st pic Lu pourin flour in the bowl, and 2nd chopping up the walnuts.

3rd pic packin down the brown sugar *which was her favorite to do* 4th wiskin the egg *whiched she also loved, I think she beat that pour egg out of it senses ....

And here you go ... YUM with some choc syrup over top DOUBLE YUM!!!! Yes I have eaten half the pan, but don't tell you, I, and blog land will keep it a secret :) Wouldn't want my thighs to find out HAHA!
Lu sure does make one mean blondie/brownie!

Heres the Ingredients:
1 cup sifted all-purpose flour
1/2 teaspoon baking powder
1/8 teaspoon baking soda
1/2 teaspoon salt
 1/2 cup chopped walnuts
1/3 cup butter
1 cup packed brown sugar
 1 egg
1 tablespoon vanilla extract
2/3 cup semisweet chocolate chips

And the How To's:
Preheat oven to 350 degrees F (180 degrees C).

Measure 1 cup sifted flour. Add baking powder, baking soda, and salt. Sift again. Add 1/2 cup chopped nuts. Mix well and set aside.
Melt 1/3 cup butter. Add 1 cup firmly packed brown sugar and mix well. If shortening is used, add 1 tablespoon hot water. Cool slightly.
Add egg (beaten) and vanilla. Blend well. Add flour mixture, a little at a time, mixing well.
Spread in 9 x 9 x 2 inch pan. Sprinkle 1/2 to 1 cup chocolate chips on top. Bake for 20 to 25 minutes

I have noticed lately alot of my bloggy friends are in the same "circle" ... and you all do different things with your kids regarding food throughout the week art, cooking, baking, kids cookbooks ect ect, don't forget to link up even if you posted it on last Sunday ... We want more great ideas!
And Don't forget to follow, if you keep coming back for more,consider following :)

Wednesday, January 20, 2010

LOOK at all these ... I'm sewed out this week!


My neice is having her 4th birthday party in less than a month *cupcake themed* my sister and I made aprons for the guest.

Here are some of the patterns (Lis is in the middle, she got a special fabric w/ pockets on hers too which no other child got) All the other aprons have duplicates.

I think they turned out darling, and what a great "parting" gift!

And let me tell you something, candy these days is soo expensive, and usually we put together senseless candy bags and send them home with the kids, only for their mom's to throw away. This project seems expensive but its not. I raided the $1.50 table at walmart paid 8 bucks got 4 childs apron out of every yard, the ribbon for the ties cost $12 and so that was a grand total of 20 aprons for $20 now tell me could you do that with goody bags?? Yes it takes a little time and effort on your part, but soo well worth it! My child can use it to bake, cook, paint ect ect ... I wont chuck it into the garbage like I would candy!
Can't wait to see what Bran has in store for me next year! LOL

Monday, January 18, 2010

Muffin Tin Monday


Today we did MTM at my sister's house, you all know my sister right? Bran over at Adventures of a Flake, yah well she had me enlisted in a sewing project *that I wil lpost about later this week so stay tuned* so i've been to her house twice in 1 week, which is alot seeings how's I live almost 2 hrs away! No school for the kiddos today MLK day!

Top Row: pears, cheese, ham
Bottom Row: coleslaw, air head, roll
Lu was so sweet she had 90 cents and really was itching to spend it bc she is usually good at "saving" so she bought a pk of 6 airheads for 86 cents (so that everyone could have one) so we included it in their lunches :) I was so proud of her for sharing!

and they all had a picnic in the living room! So much fun huh! No theme for MTM today which worked out well for us!

Friday, January 15, 2010

S'mores in a Bag ...


I just love when there is no school! Lu and I get to spend so much time together, and get to do new stuff and try more crafts, food, ect ect ... I found (well Lu found bc she steals my magazines LOL) this idea in Family Fun, Smores in A Bag! Sounds fun right? RIGHT!

First put one graham cracker in a ziplock bag and crush (Lu crushed with her fist and it worked quite well and fast)

Next put 3 heaping tbsp of marshmallow cream and 1/4 cup of chocolate chips (the recipe called for 2 tbsp, but when she started kneading it didn't seem like enough so we added more, also I chopped the chocolate chips into fine pieces) Then knead the bag together until nice and gooey!

Cut a NICE SIZED hole it the bottom of the bag and squeeze into mouth, enjoy!
*note*
It taste pretty good! She needed a little help getting it out of the bag so the hole I ended up cutting was pretty big! It was a pretty fun experience, and I had all the ingredients on hand.

Quick Hair Accessories!


I have alot of "scrap fabrics" some of them are years old and some are from recent projects, but I just can not bring myself to throw away that strip of fabric! I got this idea from here. I made them a little differently than she did, I used fabric instead of ribbon, they are SUPER easy to make take 15 mins max, and jazz up a cute little outfit!

Don't ya'll just love em'?? I do! I made a flower for an embellishment on the first one, embellished the second one with buttons, and the third I left as is, I think it'd be a cute one for Valentines day!
Follow the tutorial from the website I gave you from above, if you wanna do it with fabric, fold over the edges and hem, so you don't see any rawness!
They even look great on me! Think I am gonna go make some more "adult friendly" ones, with less bright colors LOL!
I linked up to We made it! Friday Showcase

Thursday, January 14, 2010

Kids in The Kitchen- Tatortot Casserole


Ok I will be honest, I lied about cooking something from the cookbook that I featured last week (well I wasn't lieing at the time) it just so happens that Lu was chopping at the bit to help me with something else, so I let her, of course I grabbed my camera and started snapping away, and it just turned into my post! I know you guys don't mind :) We cooked dinner together again this week! She absolutley loves to help me with the Tatortot Casserole, with that name what kid doesn't?  If you haven't heard of it and you think all the ingredients in it would make it less desirable, note this, it is actually one of my husband favorit meals!!! Can you beleive that? It is good .. but favorite?? I don't know! It has become a staple in our house though!
Heres how to make it:
1st step is not pictured, brown and drain ground beef & put into a casserole dish Preheat oven to 350

Then pour and spread 1 can of cream of mushroom soup over meat, then add one cup of cheese over top of the soup, then add enough tatortots to cover cheese (usually 1/2 bag) Then put it in the oven for 40 mins

Take it out of the oven spread ketschup on it and pop it back in the oven for 5 more mins. (I have tried it without the ketschup bc the actual recipe I have doesn't have ketschup in it, but it isn't NEAR AS GOOD)

And VOILA! Easy, Simple, and GOOD!
Link all your kids in the Kitchen post up ... can't wait to see all you recipes, ideas, and cookbooks! Tell all your bloggy friends about it, and DON'T forget to become a Follower!

Tuesday, January 12, 2010

Repurposing your child's old shirts!

I did a little sewing project tonight, I am still trying to decide weather I like it or not, but the only reason I am posting it, is because my dear husband thought it turned out cute! I am sure it will grow on me LOL! Maybe it was the fabrics I used or how I did it! Anyhow I have seen stuff  "like" it on other blogs but no tutorial, so I just kinda "put it together" how I thought it should be.

A mom in my mommy group brought me a bag full of clothing she got while thrifting, the whole HUGE bag for $5 bucks, some of them were WAY to big, others had a small hole, or stain so I decided to repurpose them. I cut off the portions of each shirt I liked .... turned them inside out and sewed together.

It was cute on my little Lu, she wears everything well! *In this picture it looks like the arm holes are too big but I promise its the way shes standing.* Anyways ...3 shirts =1 dress I think it would look cute with a pair of leggins. If you like it and would like step by step directions let me know & I would be happy to tell ya'll how!